
Creating a Project in IntelliJ IDEA - A Beginner's Guide
IntelliJ IDEA is the most popular IDE (integrated development environment) for Java. In this lesson we will walk through, step by step, how to create a new Java project in IntelliJ IDEA - from launching the program to a ready project structure with a Main class. The guide is aimed at beginners and works for both the free Community edition and Ultimate.
Before you start
To write and run Java code, you need two things:
- An installed JDK (Java Development Kit) - the toolkit for developing in Java. Without it, the project will not compile. IntelliJ IDEA can download a JDK right from the New Project wizard, so you do not have to install it separately.
- An installed IntelliJ IDEA. For learning, the free Community edition is enough - it handles any console Java program with ease.
Creating a new project
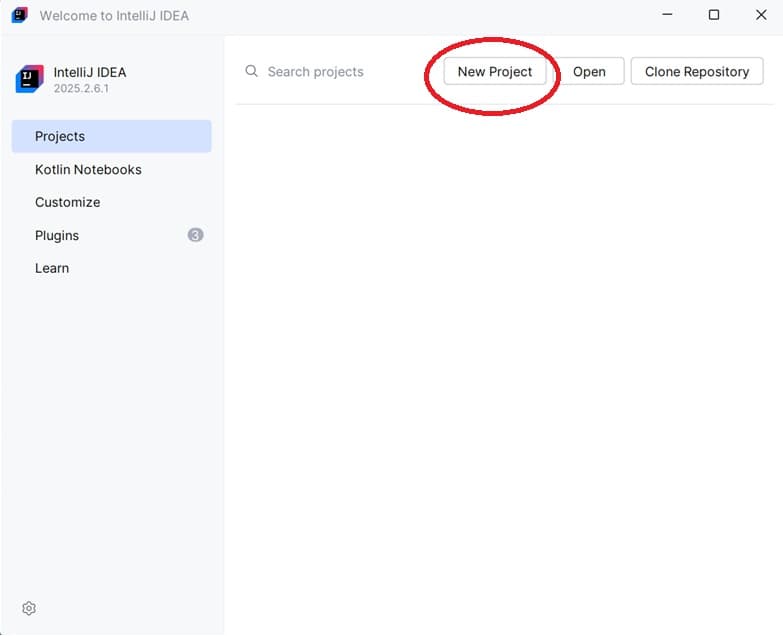
Launch IntelliJ IDEA. If you are opening it for the first time, the Welcome screen appears. Click the New Project button (in older versions - Create New Project):
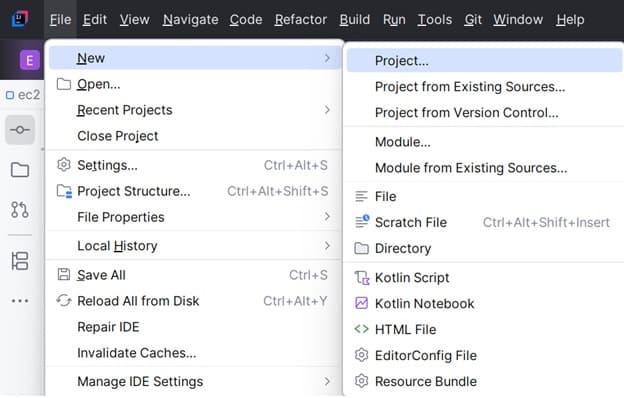
If you have worked in the IDE before, your last project opens on launch. In that case, create a new project through the menu File → New → Project:
Project settings: name, folder, JDK
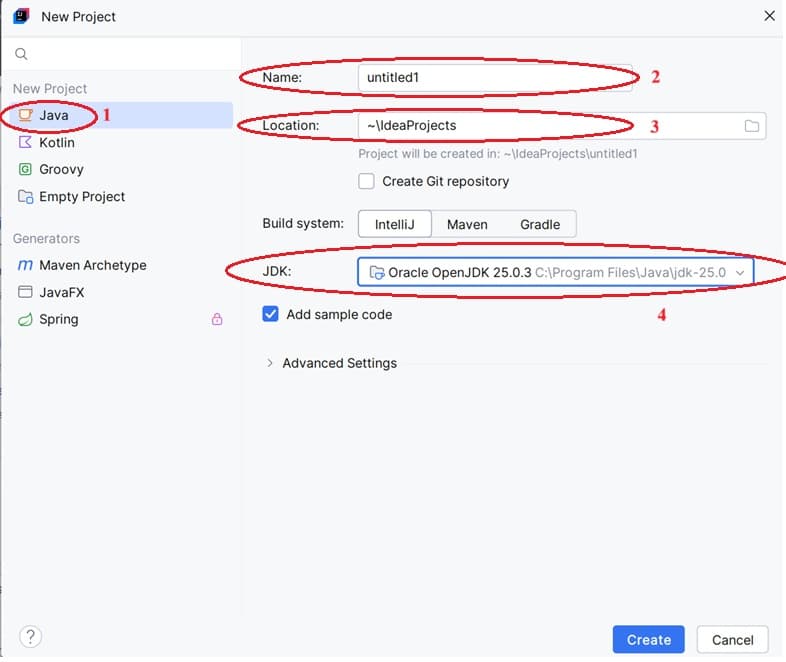
The New Project wizard opens. Fill in the fields:
| Field | What to enter |
|---|---|
| Name | The project name. The default is untitled - it is better to set something meaningful, for example HelloWorld. |
| Location | The folder on disk where the project will be saved. |
| Language | The project language - choose Java. |
| Build system | The build system. For your first lessons, IntelliJ is the easiest option - it needs no setup. Maven and Gradle come into play for larger projects with dependencies. |
| JDK | The Java version the project will run on. Pick the JDK you need from the list. |
| Add sample code | If checked, the project is created with a ready Main class and a main method instead of being empty. Handy for a quick start. |
Once the fields are filled in, click the Create button:
Good to know
The wizard looks a little different from one IntelliJ IDEA version to another, so the exact set of fields on your screen may not match the screenshots. The essentials stay the same: set a name and folder, choose the Java language, and pick a JDK. For learning, feel free to leave Build system set to IntelliJ — that way you skip dealing with Maven or Gradle at the very start.
If the JDK is not in the list
Sometimes the JDK field is empty - this means the IDE did not find an installed Java. Open the drop-down and choose one of the options:
- Download JDK - IntelliJ IDEA downloads and installs the Java version for you (for example, from Oracle, Amazon Corretto, or Eclipse Temurin). The simplest path for a beginner.
- Add JDK from Disk - point to the folder of a JDK already installed on your computer, if you installed it separately.
After you choose one, the JDK appears in the list and you can create the project.
Structure of the created project
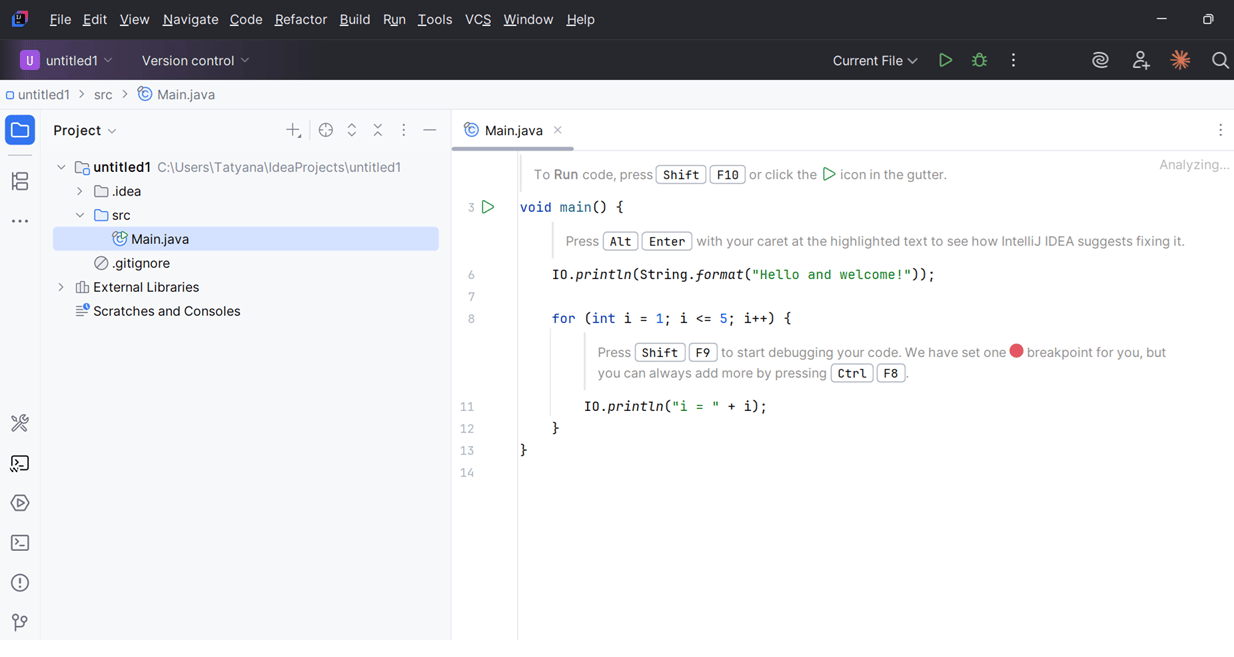
Done - the project is created and opened. On the left, in the Project tool window, you can see its structure. Because Add sample code was checked, the src folder already contains a Main class, and its code is open in the editor on the right:
Key parts of the structure:
- src - the folder with source code. This is where you create your Java classes.
- Main - a class with a
mainmethod, the entry point of the program. Execution starts here. - External Libraries - the linked libraries and the JDK itself.
Now you can run the program (the green triangle next to the main method) and start writing your first Java code.
Frequently asked questions
Which JDK version should I choose for a new project?
For learning, pick a current LTS version - for example, JDK 25 or JDK 21. LTS (Long-Term Support) releases are supported for years and are what most projects and tutorials target. If the version does not matter for your case, take the newest LTS in the list.
Build system: should I pick IntelliJ, Maven, or Gradle?
For your first lessons, choose IntelliJ: it needs no setup and is ready to run immediately. Maven and Gradle are for projects that use external libraries and dependencies - they automate downloading and building them. You can switch to Maven or Gradle later, once you are comfortable with the basics.
What if the JDK list is empty?
It means the IDE did not find an installed Java. Open the drop-down in the JDK field and choose Download JDK - IntelliJ IDEA will download and configure the right version for you. If a JDK is already installed on your computer, use Add JDK from Disk and point to its folder.
What does the Add sample code checkbox do?
When it is checked, IntelliJ IDEA creates a ready Main class with a main method that you can run right away. That is convenient for a quick start. If you uncheck it, the project is empty and you create the first class yourself.
Video Explanation
Prefer video format? Watch this lesson with examples and explanations.
Comments